Smock Right

Instructions for The Pullen Pleater

A Machine Used For Gathering Pleats For English Smocking

Download instructions as PDF

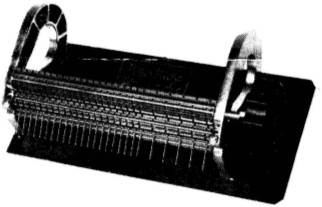
  1. Left hand end plate.
  2. Right hand end plate.
  3. Base of the machine.
  4. Needles inserted into the grooves.
  5. Drop in roller.
  6. Keeper and keeper screw.
  7. Knob.
  8. Left hand groove for the fabric to pass through.
  9. Right hand groove for the fabric to pass through in certain pleating instances.

DIRECTIONS FOR PUTTING MORE NEEDLES INTO THE MACHINE, OR FOR TAKING NEEDLES IN AND OUT OF THE MACHINE.

  1. Loosen the keeper screws.
  2. Tilt the machine back; prop it on a book. If you do not tilt the machine, the needles will tend to fall out.
  3. Slide the keeper forward on the loosened screw. This means you do not have to totally remove the screws and the keepers.
  4. Using your thumb, gently roll the small roller (drop in roller) up and off of the machine.
  5. Reposition the needles according to your pleating needs.
  6. Gently roll the drop in roller back into its place. Be sure you align the half spaces of the drop in roller with the half space grooves on the pleater.
  7. Tighten the screw just until you feel resistance, then turn just a tiny bit more. Do not over-tighten. If the keeper screws are loose, the needles are not held in place with the drop in gear and the needles might bend or break.

GENERAL SUGGESTIONS FOR OPERATING THE PULLEN PLEATER

  1. The edge of the fabric to be fed into the machine should be cut straight and started evenly to avoid a crooked pleat.
  2. To minimize dulling of the needles and machine wear, avoid turning the pleater without fabrick in it.
  3. If you run a strip of wax paper through the pleater prior to pleating, the needles are lubricated and will pass through the fabric more easily. Before using half spaces for the first time, run a double thickness of wax paper through the pleater. Small black specks of material may be seen. This is normal; we try to remove them during processing, but sometimes a few remain in the rollers.
  4. Replace bend and dull needles. If bent needles are not replaced, they can jam the cloth and break in the machine while starting the pleating. One can usually identify a bent needle as one that moves excessively while turning the pleater or by an unusual angle compared with the other needles. Dull needles make starting the pleating more difficult.
  5. From time to time you may sharpen your needles by using an emery. Needles do not need to be changed after a certain amount of time.
  6. Most fabric may tend to pile up on the needles as it comes out of the pleater. This can make the pleater hard to turn. If this occurs, you can gently slide the fabric along the needles onto the thread as it accumulates on the needles. With BROADCLOTH the material will pile up on the needle, making it stiff. Be sure you strip the material from the needles onto the thread or else needles will BEND or BREAK.
  7. Even on batiste and other lightweight fabrics, it is best to CUT OFF THE SELVAGE BEFORE BEGINNING YOUR PLEATING.
  8. It is important to get the fabric started correctly for easy pleating. DO NOT FORCE OR PULL THE FABRIC INTO THE ROLLER GEARS TO GET IT STARTED. Align the fabric straight into the gears and let the gears grab the fabric as you start turning. Start SLOWLY and do not use excessive force. Although it is unlikely to occur, when you are starting to pleat, if the fabric should jam and some of the needles start moving wildly, the pleater may become very difficult to turn. DO NOT USE EXCESSIVE FORCE. Stop and back the fabric out of the pleater. If this happens, check the needles with your finger. If any needles are excessively loose, they are probably bent and need to be replaced. With experience, you will be able to tell how much force is required to pleat various types of fabric.
  9. Somtimes, it is best to gently "rock" the fabric into the pleater to get it going.
  10. If you do not follow these instructions, broken needles could occur.
  11. The pleater is lubricated at the factory and should not require further lubrication.
  12. The pleater should be kept in a dry place, since the needles rust when exposed to moisture. This is the same principal which applies to razor blades' rusting.

SUGGESTIONS FOR PLEATING BROADCLOTH AND OTHER HEAVIER FABRICS

  1. ABSOLUTELY, ABSOLUTELY, TRIM OFF THE SELVAGE ON HEAVIER FABRICS!!! This is a good idea for all fabrics, but a MUST for anything other than batiste. Selvages on broadcloth, corduroy, etc. are excessivey heavy; they must be cut off.
  2. Rubbing a bar of soap along the edge of the fabric to be pleated will get the fabric started. Since it is difficult for the needles to puncture and penetrate the heavier fabrics, they may be a little harder to pleat.
  3. If you run a strip of wax paper through the pleater prior to pleating, the needles are lubricated and will pass through the fabric easier.
  4. When starting fabric, GO SLOWLY! Do not force the fabric into the roller gears. Let the roller gears grab the fabric and pull it through. Turn the knob SLOWLY. This is especially important at first, when you are grabbing the fabric. Those first turns are the ones where the needles penetrate the fabric. This is the point of most stress.
  5. A very slight back and forth motion sometimes helps to get the fabric started. If it jams and gets very difficult to run, do not use extreme force, since needles can be broken or bent.
  6. If the fabric should jam in the pleater, remove the drop-in roller gear and remove the needles and fabric. This way, you don't have to "cut out your pleating."
  7. Always use the exact number of needles. Leaving the other needles in the machine just wears out the needles and may cause them to break.
  8. If you are pleating over French Seams, rubbing a bar of soap on the seams before pleating them is a good idea. The seams must be tiny and flat.
  9. If the machine becomes stiff to operate, chances are that you have wound some threads into the machine or around the shaft of the roller. Pick these out carefully with a small needle and cut them.
  10. We do not recommend the use of our short needles with broadcloth. Excessive pressure may cause needles to break.

PREPARING THE FABRIC FOR PLEATING A GARMENT

  1. Thread the required number of needles. I use a 36" long piece of quilting thread for each needle. Thread the end of the thread into the needle from the bottom and pull 6 inches of it through. Let the long end hang.
  2. Do not cut off the armholes of the dress fabric after the fabric has been pleated.
  3. The right side of the pleating should be downwards when going through the machine. The tallest pleats come from the bottom of the pleater.
  4. Lay the fabric on the floor or on a table, right side down, and roll onto a dowel stick. Run the fabric throught the pleater right side down.

    Now for a word on dowel sticks. Usually, I use a 1/4" wooden craft type dowel stick. Mine are about 36" long. However, some people like small thin steel rods which give some weight for holding the fabric and dowel in place while pleating. Some people like a cafe curtain rod which opens or closes as much as needed for garments, either adult or child. The size of the dowel should be compatible with the fabric type used.
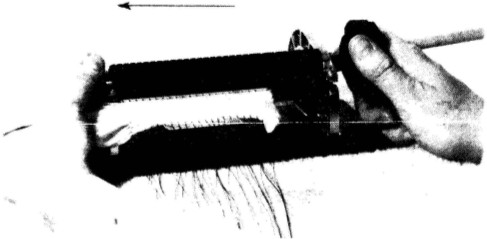
  5. Put the rolled fabric on the dowel stick, through the left hand side of the pleater.
  6. Line up the exact rows you want to pleat. Eyeball the groove that you must use as a guideline in order to run the pleating through evenly.
  7. Leave one whole pleater space for the guideline.
  8. Hold the fabric and begin to guide it through. BE SURE YOU HAVE READ ALL OF THE GENERAL INSTRUCTIONS AND SUGGESTIONS FOR PLEATING HEAVIER F ABRICS.
  9. As your fabric goes through the pleater IT IS IMPORTANT TO GENTLY PULL WITH THE LEFT HAND, THE THE FABRIC EDGE WHICH HANGS OUT THE LEFT SIDE. PULL PARALLEL WITH THE ROLLERS. You are not pulling the fabric through with this pull; you are just keeping bumps from forming in the pleats. The rollers and the handle pull the fabric through. This parallel pull is just to make beautiful pleats.
  10. As the fabric comes onto the needles, stop, and gently, gently guide the fabric off of the needles. Do not force or jerk, since this could bend the needles.
  11. If the fabric jams, do not cut it out. Loosen the screws, remove the needles, and remove the fabric.

Very Important Note!!

When using double needles (whole space and half space), the machine will be harder to turn. This is especially true for BROADCLOTH, which is harder to turn, even using single space needles. This is normal. Turn slowly and carefully. Trim ALL SELVAGES. We recommend using as few of the needles as possible with broadcloth. Half-spaces with broadcloth increase the possiblity of breaking needles.

Download instructions as PDF

Contact Us


Please ask us any questions and we will let you know what we can do to help you.